Enroll certificates to YubiKeys
Pointsharp ID Server enables secure certificate enrollment for YubiKeys, allowing authorized users to enroll and revoke certificates directly through the User Portal in combination with the Net iD Client.
A YubiKey is a hardware-based security device designed to securely store cryptographic keys. It requires user presence, such as touching the device or entering a PIN, to authorize operations. YubiKeys are commonly used for strong user-to-application authentication, such as accessing websites, enterprise systems, or corporate networks.
To support smart card certificate enrollment, your environment must be properly configured. This includes setting up a Group Managed Service Account (gMSA) and configuring a Microsoft Certificate Authority (CA) to issue smart card certificates using an Enrollment Agent Certificate.
This guide provides step-by-step instructions for the complete setup process, from creating and configuring required accounts to assigning permissions and validating the solution through testing.
Prerequisites
-
A Pointsharp ID Server with User Portal must be in place before starting this configuration.
-
Net iD Client installed on the computer doing the enrollment.
-
You must have a valid Enrollment Agent certificate issued to a trusted account. This certificate is required to sign certificate requests for smart card issuance.
-
Ensure you have administrative access to Active Directory, the Certificate Authority, and the ID Server(s).
Create the gMSA in Active Directory
-
Open PowerShell on a domain controller.
-
Run the following command to create the gMSA:
$ New-ADServiceAccount -Name MyIDServerGMSA -DNSHostName yourdomain.local -PrincipalsAllowedToRetrieveManagedPassword "YourIDServer1$,YourIDServer2$"
-
Replace
MyIDServerGMSAwith your desired gMSA name. -
Replace
YourIDServer1$,YourIDServer2$with the names of your ID Server(s).
-
| Every ID Server name must end with $. |
Set up the certificate template on the Certificate Authority (CA)
-
Open certsrv.msc on your CA server.
-
Duplicate the Smart Card User template:
-
Right-click Certificate Templates > Manage.
-
Right-click Smart Card User > Duplicate Template.
-
-
Configure the new template:
-
General Tab: Name the template (e.g., "Custom Smart Card Enrollment"). Note the Template Name - this is needed in the PSID Admin GUI later on. (This is not the "Template Display Name").
-
Subject Name Tab: Ensure "Build from this Active Directory information" is selected (default).
-
Issuance Requirements Tab:
-
Set This number of authorized signatures to 1.
-
Under Application Policy, select Certificate Request Agent.
-
-
Security Tab:
-
Grant Enroll permission to the gMSA (
domain\MyIDServerGMSA$). -
Grant Issue and Manage Certificates to the Enrollment Agent account.
-
-
-
Publish the template:
-
In certsrv.msc, right-click Certificate Templates > New > Certificate Template to Issue.
-
Select your new template.
-
-
In the certsrv.msc right-click the Issuing Server Name and choose Properties:
-
tab Security: add the gMSA Account. Set it to Issue and Manage Certificates and Request Certificates.
-
-
In the certsrv.msc right-click on Certificate Templates and choose Manage. Locate the new Enrollment Certificate created and right-click, choose Properties.
-
tab Security: add the gMSA Account. Set it to Read and Enroll.
-
Install the gMSA on the ID Server(s)
-
On each ID Server, run:
$ Install-ADServiceAccount -Identity MyIDServerGMSA
-
If "Install-ADServiceAccount" command fails and is not recognized, run this command to install Remote Server Administration Tools:
$ Install-WindowsFeature RSAT-AD-PowerShell
Then try again.
-
Verify installation:
$ Test-ADServiceAccount -Identity MyIDServerGMSA
Configure the service to use the gMSA
For IIS:
-
Open IIS Manager > Application Pools.
-
Select the CertAppPool > Advanced Settings > Identity.
-
Set to Custom account and enter
domain\MyIDServerGMSA$(no password needed - the password field should be greyed out once the gMSA Account is entered). -
Click OK all the way back to close the Advanced Settings dialogue.
-
Restart IIS.
Import the Enrollment Agent Certificate to the local machine store
-
The Enrollment Agent Certificate described as a prerequisite needs to be imported into the ID Server in Local Computer and Personal. This needs to be created using the Enrollment Agent Template. Default Windows Template. This is not the newly created Certificate Template that was made in step "Set up the certificate template…" above.
-
Log in to the ID Server as an administrator.
-
Open MMC (mmc.exe).
-
Add the Certificates snap-in for the Local Computer.
-
Import the Enrollment Agent Certificate to the Personal store that was described as a prerequisite.
-
Note the Thumbprint. This is needed later on, in the PSID Admin GUI.
Grant gMSA permissions to the Private Key of the Enrollment Agent Certificate
-
In MMC, locate the Enrollment Agent Certificate in the Personal store.
-
Right-click > All Tasks > Manage Private Keys.
-
Add the gMSA (
domain\MyIDServerGMSA$) and grant Read permissions.
| Repeat steps from Install the gMSA on the ID Server(s) to Grant gMSA permissions to the Private Key of the Enrollment Agent certificate for each ID Server, if you have multiple |
PSID Admin GUI Configuration
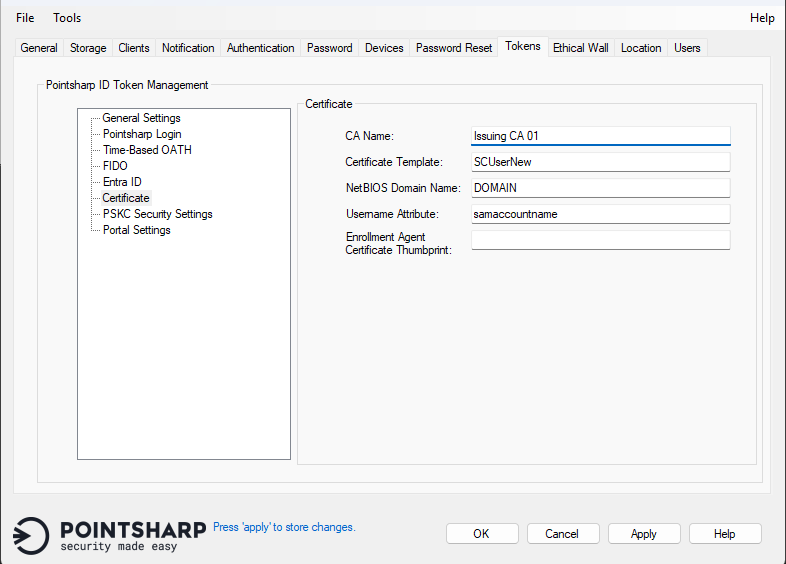
Open the PSID Admin GUI on the Pointsharp ID Server and follow these steps:
-
Open the tab Tokens.
-
Click Certificate listed under General Settings.
-
CA Name: Set the name of the Issuing CA Server.
-
Certificate Template: Add the name of the certificate template to be used for enrollment on the above-mentioned CA Server. (This is not the "Template Display Name".)
-
NetBIOS Domain name: Set the NetBIOS Domain name for the ID Server.
-
Username Attribute: Default example
sAMAccountName. Set the attribute used as username. -
Enrollment Agent Certificate Thumbprint: The thumbprint of the issued Enrollment Agent Certificate, present in the local machine store.
-
The local certificate used for the "CertApi" website must be trusted by the Pointsharp ID Server itself.
-
Go to tab General and click Restart to inject the changes into the configuration.
Add Certificate option in User Portal
There are two options to make this feature visible for end users in User Portal.
Option 1
-
Open the IIS Manager on the Pointsharp ID Server.
-
Expand the Default Web Site and click UserPortal.
-
Click Application Settings in the top row of the middle section of the IIS Manager GUI.
-
Locate the value
SECURITY_TOKEN_SELECTABLE_TYPES. -
Add
,Certificateat the end of the value that lists all token variations. -
Reload User Portal Website and it should now be visible under Security Token and Add New.
Option 2
-
Open the File Explorer and go to C:\Program Files\PointSharp\UserPortal.
-
Locate the web.config file and open it in Notepad (must be as an admin).
-
Locate the value
SECURITY_TOKEN_SELECTABLE_TYPES. -
Add
,Certificateat the end of the string. -
Reload User Portal Website, and it should now be visible under Security Token and Add New.
PointSharpLoginToken,HardwareToken,PointsharpTOTPToken,FidoToken,FidoTpmToken,EntraID,GoogleMobileToken,Certificate
If any of the other options should not be used or visible; just remove them and refresh website.
Net iD Client
These Registry Settings makes the Net iD Client able to reset PIN on the YubiKey, and add the certificate for the specified domain.
-
The client computer accessing the User Portal to enroll certificates must have the Net iD Client installed.
-
The web browser on the computer where the Net iD client is installed must also have the Net iD browser extension enabled. Otherwise, the user may receive access error messages.
After installation of the Net iD Client – follow these steps:
-
Edit the NiC-UserPortal.reg file.
-
Edit the URL value to match your own user portal address:
"PointsharpUserPortal"="https://idserver.contoso.com/userportal"
-
Edit the hostname to match your own hostname:
"70"="https://idserver.contoso.com,full"
-
Double-click the file to import the file to the Registry.
Preparation and configuration for Certificate Enrollment in User Portal is now completed.