Migration
The following guide will take you step by step to the new Appliance recommended and tested by our Support staff and customers.
Collect the data for the new appliance and check for completeness
According to our Quickstart guide - step 2
|
BestPractice
Depending on the size and structure of your business, different stakeholders may need to be involved in your preparations. We strongly recommend you identify these stakeholders during your preparation and have these items completed so the installation can be carried out smoothly. |
New (temporary) IP address
In general, you need a public, static IP address for your Cryptshare Server. In case you already have such an address in use, you’ll need only a temporary address as long both servers are needed (the current one & the new one)
SSL certificate
The existing certificate will be copied in the process. If you want to change the certificate, please follow the instructions in SSL Certificate and the related articles there.
Select or define the Administrators
It is mandatory to configure the email address of a user or a user group as administrators of the Cryptshare Server. It will send notifications to this email address in case of available updates, warnings, or errors. Without an administrator email address, the configuration cannot be completed. Please decide which email address should be used and set up a user group in your mail server directory, if required.
Create the new Appliance
Create the new Appliance for vSphere or download one for the Hyper-V in our VM Build Service: Cryptshare Buildservice.
Update your old Cryptshare Server
Update your old Cryptshare server to the version for which you created or downloaded a new appliance in the previous step. Otherwise, it will not be possible to transfer the old database.
Add a virtual Disk
Cryptshare uses different storage locations to save.
-
Temporary files
Temporary files are created during the upload, virus check, encryption process, or any other pre-processing tasks.
-
The transfer files
The folder where the payload of the system is stored, i.e. the encrypted files and messages that are being transferred from A to B, reside in this folder until they are automatically deleted after the retention time has expired.
-
Backups
The folder into which you can back up your system configuration, transfer metadata, and the transfer data itself.
These storage locations should be sized according to your requirements and have to be configured in the Cryptshare Server.
Sizing calculation
|
Sizing Calculation
To determine the correct size for your needs, add the results of the following formulas: suggested Temp folder size = (Max allowed Transfer size * 3) suggested retention folder size in MByte = expected average number of transfers per day) * (expected average transfer size in MByte) * (maximum planned retention time suggested backup folder size = depends on your backup strategy
This will provide enough space for your transfer data, the temporary directory and also if you want to back up the system configuration and transfer meta data to this disk. |
Now add the additional virtual disk with the preferred size to the appliance using the instruction Extending available disk space
To configure the Temp directory, refer to System Startup Settings - Temporary Folder
|
enlarge an existing disk
Please follow this guide to enlarge the hard disk, if necessary: Freeing Disk Space on a Cryptshare Server |
Next steps with the new Server
-
Start the Server.
-
Log in via PuTTY as root and proceed with these commands:
systemctl stop cryptshare (use rccryptshare stop up to and including v.7.1)
echo "" >> /opt/cryptshare-3/launcher.ini echo "vm.arg.1=-Djava.io.tmpdir=/var/opt/cryptshare-3/tmp" >> /opt/cryptshare-3/launcher.ini
Proceed at the old Cryptshare Server
-
Create a Backup of the database at the old system with the Name: cs3-MovingBackup.
-
Log in via PuTTY as root and proceed with these commands:
*systemctl stop cryptshare* (use *rccryptshare stop* up to and including
v.7.1)
Now start the Copyjobs to copy the data from the old Cryptshare Server to the new one.
scp /opt/cryptshare-3/upload (or your actually used path)/++\*++
root@CRYPTSHARE++\_++NEW:/var/opt/cryptshare-3/uploads
scp /opt/cryptshare-3/backup (or your actually used
path)/cs3-MovingBackup.zip
root@CRYPTSHARE++\_++NEW:/opt/cryptshare-3/backup
scp /opt/cryptshare-3/lib/security/keystore
root@CRYPTSHARE++\_++NEW:/opt/cryptshare-3/lib/security/
scp -r /opt/cryptshare-3/resources/ui
root@CRYPTSHARE++\_++NEW:/opt/cryptshare-3/resources
If you changed the ports or SSL passwords
scp /opt/cryptshare-3/resources/WEB-INF/?i-config.xml
root@CRYPTSHARE++\_++NEW:/opt/cryptshare-3/resources/WEB-INF/
Finishing Steps to Activate the New Server
-
Log in via PuTTY as root and proceed with these commands:
*systemctl start cryptshare* (use *rccryptshare start* up to and
including v.7.1)
-
Log in to the Administrative Interface and restore the DB backup cs3-MovingBackup
|
Please note: Using this way the database can be restored if one of the following Cryptshare versions is installed on the old server: 4.3.0 If different versions are used, the web interface will be no longer available after the database has been restored. Attention! Please only restore the database! Do not restore the system data and/or transfers this way! 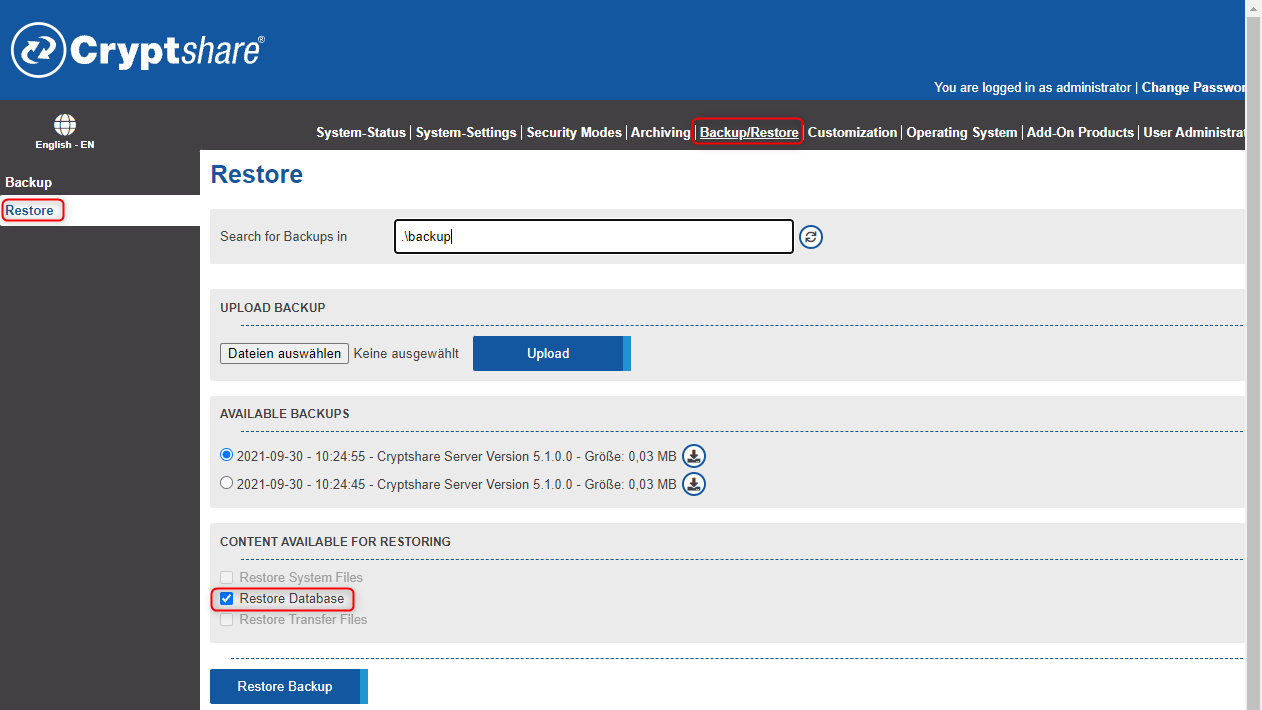
|
-
Please make sure that all path names in the Administration Interface match the actual file locations:
-
Uploads: Check System Settings > Transfer Settings
-
Backups: Check Restore/Backup
-
Temp: Check System Status > Scroll down and click on Java Runtime Environment
-
Disk Space Monitoring: System Settings > System Notifications > Check if all monitored paths are valid.
-
-
Change the firewall and DNS settings (switch to the new IP address)