Recurring Multi-Factor Authentication
Recurring Multi-Factor Authentication (MFA) is used to enable an easy and smooth way to add MFA for, for example, ActiveSync or MAPI over HTTPS.
Recurring MFA adds a time based authentication demand. A notification will be sent out to the user demanding a verification of identity. If the verification does not happen within the set time limit, the application will be set in Quarantine state by Pointsharp until the identity is verified, and blocking email synchronization.
Once identity is confirmed, the device will be released and function as normal again. When the device hits Quarantine state, a new notification will be sent that can be configured to include additional help text explaining what the user needs to do to resume functionality.
Notification for ActiveSync and Outlook (MAPI)
Prerequisites
Additional passwordless option with external access via Pointsharp Access Gateway
A recommended setup is using Login App with push configured as passwordless. This will simplify the process for the user to confirm identity and continue using mail. The user can then via a published "/extend" rule in the Pointsharp Access Gateway verify the identity easily using a passwordless authentication with the Login App.
Step 1 — Pointsharp ID
| Go to Pointsharp Docs > ID Server > Pointsharp ID Admin > Devices, to get the complete instructions. |
-
Start Pointsharp ID Admin GUI as an administrator.
-
Go to the Devices tab.
-
Click Add under the New access policy.
-
Name the access policy.
-
Click Add again.
-
Choose Type.
-
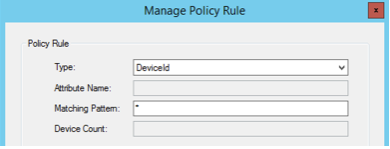
Configure the policy rule according to needs. This guide uses a simple Device Rule that sets all devices in Quarantine. Group membership options etc. can be used as well.
-
Set the Action to Quarantine.
-
Set the Recurring Authentication Timeout.
An example how it can be configured:

-
Next step is the Notification. Click the Manage Notification button at the bottom.
-
Create new Event Notifications for Device about to Timeout and one for Quarantine Device.
-
This can also be sent to admins if needed: Add an Event Notification for this scenario as well.
-
Add a message to be sent to users explaining the Recurring MFA, and where the users need to go to verify their identity. For example, the URL towards User Portal, or if a resource in Pointsharp Access Gateway is used.
-
Apply the changes, and restart the Pointsharp ID Service.
Step 2 — approve devices
The devices that are in quarantine state, or awaiting approval after time out, can now be managed directly in the User Portal.
-
If User Portal is to be used for device approval, then the setup is complete.
-
If external access via Pointsharp Access Gateway is to be used, see sections below.
Optional steps
Step 3 — Pointsharp ID authentication method
If a resource in Pointsharp Access Gateway is used for external identity confirmation, the authentication method that is set in the Pointsharp Access Gateway needs to be modified to enable it to work with Recurring MFA. Go to C:\Program Files\Pointsharp\Pointsharp ID\bin and take a backup of psid3.xml file. Open it in a Notepad or similar, and search for the name of the Authentication method.
-
Search for the name of the authentication method.
-
Find the value RestoreTimedDevices and set it to true.
-
Save the changes, and restart the Pointsharp ID Service.
-
Continue with step 4 below.
Step 4 — Pointsharp Access Gateway resource
The following steps are only needed if an external resource is to be published in Pointsharp Access Gateway.
The resource is a simple webpage with login forms added.
-
Open the Pointsharp Access Gateway GUI.
-
Start the Publish App Portal wizard.
-
Click Next, and choose between Create a new Listener or Select from existing Listener. This guide uses Create a new Listener. The other option simply adds an /extend rule under an already existing Listener.
-
Add the external URL to be used.
-
Choose Extend - Restore Timed Devices.
-
Next step in the Forms Method dialog: Add the authentication method to be used for the user to validate their identity. Click Next to continue.
-
Click Next in the Portal Module dialog. No input needed, do not click Create New….
-
Click Next in the Pointsharp Portal Module Setup. No input needed.
-
Click Apply in the last Summary dialog.
-
Click Save and Publish.
The /extend site is located here on the Pointsharp Access Gateway, edit if needed C:\Program Files\PointSharp\Gateway\www\PublicResources\Portal\extend.
Recurring MFA configuration is now ready to be tested.