Installation prerequisites
This page describes the required configurations, access rights, and setup that must be completed before installing Net iD Portal.
Client requirements
The Net iD Client must be installed on all client machines.
Add Net iD Client registry key
The DNS for Net iD Portal must be configured in Windows Registry for Net iD Client.
Add the following registry key to allow Net iD Client to communicate with Net iD Portal.
HKEY_LOCAL_MACHINE\SOFTWARE\Policies\Pointsharp\NetiD\Client\Plugin\AllowURL
- Name
-
NN (number above 70)
- Type
-
REG_SZ
- Data
Firewall and port settings
Make sure firewalls are configured and that the necessary ports that Net iD Portal needs are open.
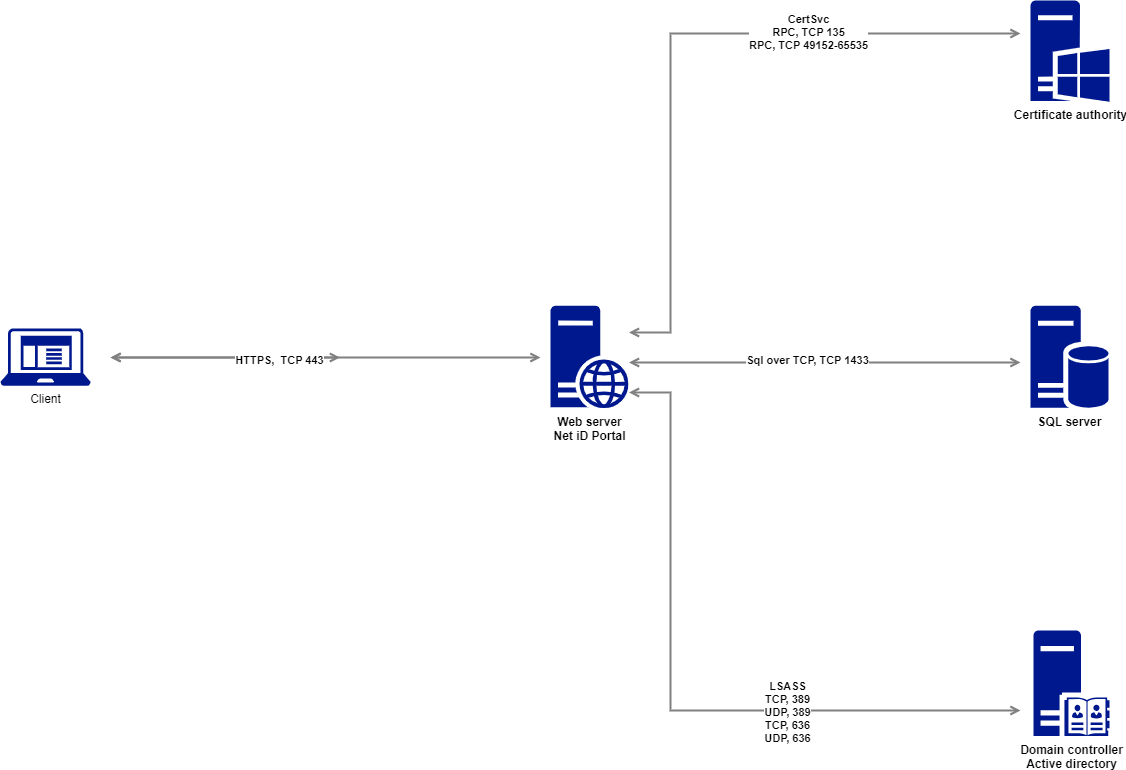
| Service | System service name | Application protocol | Protocol | Ports |
|---|---|---|---|---|
Microsoft Internet Information Services (IIS) |
W3SVC |
HTTPS |
TCP |
443 |
Microsoft SQL Server |
MSSQLSERVER |
SQL over TCP |
TCP |
1433 or optional |
Microsoft Active Directory: Certificate Services |
CERTSVC |
RPC |
TCP |
135 (or randomly allocated high TCP ports) |
EJBCA |
– |
HTTPS |
TCP |
8443 |
Microsoft Active Directory: Domain Services |
– |
LDAP |
TCP |
389/636 |
Microsoft Entra ID |
– |
HTTPS |
TCP |
443 |
Pointsharp Directory |
– |
HTTPS |
TCP |
443 |
Swedish Tax Agency, Navet |
– |
HTTPS |
TCP |
443 |
Swedish Tax Agency, SPAR |
– |
HTTPS |
TCP |
443 |
Service account
A service account must exist in active directory (AD).
The service account is used by the Net iD Portal services to communicate with:
-
SQL databases,
-
active directory (AD), and
-
certification authority (CA).
Grant the account the following permissions:
-
SQL database owner (dbo) on the required databases or dbcreator if created during installation (see below)
-
For trace logging: write permissions on the folder where trace files are saved
Required privileges for the service account will be described in each section.
Certificate requirements
Net iD Portal uses multiple certificates. They must exist before installation begins:
Public SSL certificate
A valid SSL/TLS certificate matching your portal DNS name.
| If using Net iD Access Server, a third-party wildcard or matching certificate is required. |
Net iD Portal encryption certificate
Used for signing audit logs and internal encryption. You can use the computer or web server template to create this certificate.
| The service account must have read access to the private key. |
New-SelfSignedCertificate -CertStoreLocation Cert:\LocalMachine\My -Subject "Net iD Portal SelfSigned CryptoCertificate" -NotAfter (Get-Date).AddYears(5)Enrollment agent certificate
Issued to the web server.
| The service account must have read access to the private key. |
Web server requirements
URL rewrite
For more information, see Routing.
DNS requirements
A DNS A record must be created for the Net iD Portal host.
For example, portal.customer.inc or something corresponding to your organization’s naming standards.
Internet Information Services (IIS)
A new Internet Information Services (IIS) should be installed on the domain. Install the following roles and features. The service account must be granted the right logon as a service on the local host.
-
Click Start on the taskbar, and start Server Manager.
-
Click Add roles and features.
-
In the Add Roles and Features Wizard, click Next until the Server Roles page appears.
-
In the list under Roles, click Web Server (IIS), and then click Web Server.
-
Select the following check boxes:
-
Web Server
-
Management Tools
-
IIS Management Console
-
IIS 6 Management Compatibility
-
IIS 6 Metabase Compatibility
-
-
-
-
Click Next, and when finished click Install.
SQL server requirements
Ensure access to Microsoft SQL Server Management Studio and the SQL Server instance during installation.
You may use:
-
An existing SQL Server instance
-
Microsoft SQL Server Express installed on the IIS server
For SQL system versions, see Database service.
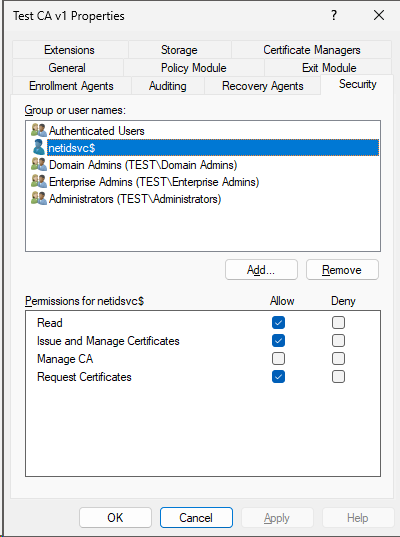
Certificate authority (CA) requirements
Set the service account permissions on the CA
The service account or group which handles interactions with the CA must be granted the following permissions: Read, Issue and Manage Certificates, and Request Certificates.
-
On the CA server, open the Certification Authority Management Console by running:
$ certsrv.msc
-
In the left pane, right-click the CA, and then click Properties.
-
In the Properties dialog, click the Security tab.
-
Under Group and user names, click the service-account.
-
Under Permissions for <service-account>, select the following Allow check boxes:
-
Read
-
Issue and Manage Certificates
-
Request Certificates
-
-
Click OK to close the dialog.
Create and configure the certificate template for authentication
This certificate template is used for smart card or YubiKey certificates.
-
In the left pane, expand the CA, and then right-click Certificate Templates and click Manage.
-
In the Templates console, right-click the certificate template Smartcard User, and then click Duplicate Template.
-
In the Properties dialog for the new duplicated template:
-
Click the General tab. In the Template display name box, type the name of your certificate template, and in the Validity period box, type the validity period.
In this example, we will name itNiP EnrollmentAgent SmartCard Userand set the validity period to three (3) years.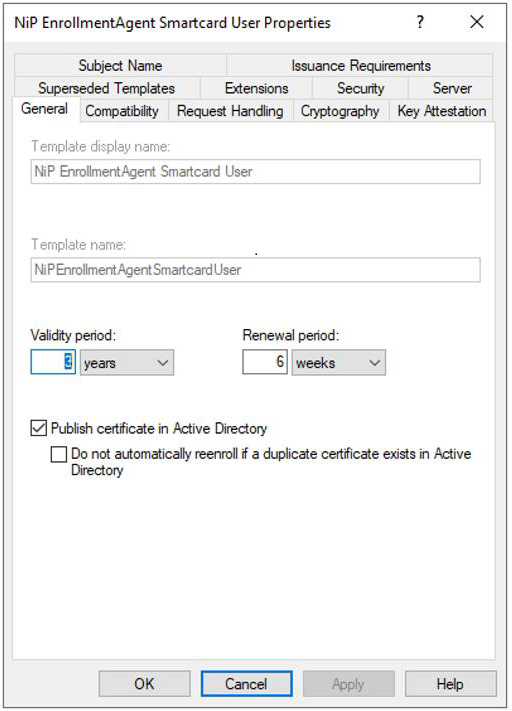
-
Click the Subject Name tab, and in the Subject name format list, select how you want the subject of the certificate to look like.
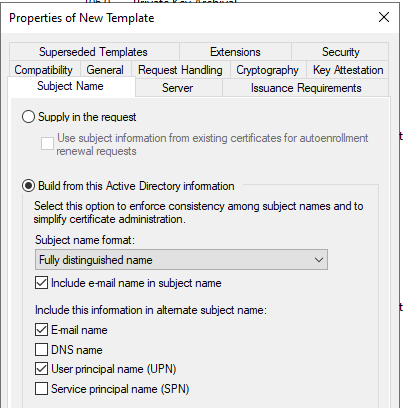
-
Click the Issuance Requirements tab.
-
Under Require the following for enrollment, click This number of authorized signatures.
-
Under Policy type required in signature, select Application policy.
-
In the Application policy list, click Certificate Request Agent.
-
-
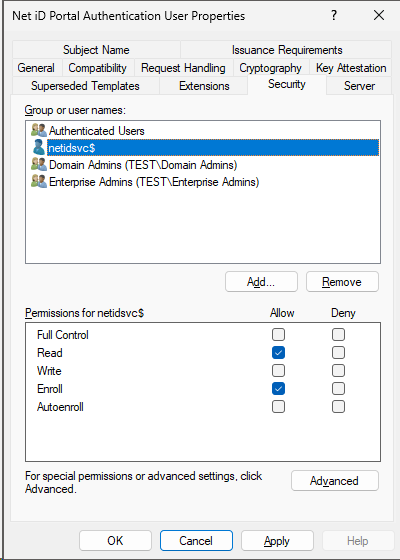
Click the Security tab. Under Group or user names, click the user group, and under Permissions for <user group name>> click Read and Enroll in the Allow column.
-
Click OK to save the new template.
-
-
Return to the CA console and right-click Certificate Templates, click New, and then click Certificate Template to Issue.
-
Click the certificate template you just created, and then click OK. In this example, we named it
NiP EnrollmentAgent SmartCard User.