Installation prerequisites
Before you can run the installation program, make sure you have done all pre-installation preparations.
-
Make sure the server requirements are met.
-
If you don’t use the wizard’s included SQL server, create the needed databases on your SQL server.
-
Set up the certificate service:
-
Create and configure the Net iD Portal Certificate Template.
-
Configure the Enrollment Agent (Computer) Template
-
Create the Encryption Certificate Template.
-
Server requirements
Make sure that the server requirements for Net iD Portal are met:
-
-
2 Cores CPU is recommended
-
8GB of RAM
-
VMWare and Hyper-V is supported
-
Firewall and port settings
Make sure firewalls are configured and that the necessary ports that Net iD Portal needs are open. See below for more information.
| System service name | Application protocol | Protocol | Ports |
|---|---|---|---|
CertSvc |
RPC |
TCP |
135 |
CertSvc |
Randomly high TCP Ports* |
TCP |
49152–65535 |
HTTPFilter |
HTTPS |
TCP |
443 |
MSSQLSERVER |
SQL over TCP |
TCP |
1433 |
LSASS |
LDAPS Server |
TCP |
636 |
LSASS |
LDAPS Server |
UDP |
636 |
Create a service account
Create a service account that Net iD Portal will use.
This could either be a group Managed Service Account (gMSA) or a regular domain user account, depending on your organization’s security policy.
Set up the database service
| Do this if you use another SQL server than the one included in the installation. |
This installation pack includes an SQL Server Express that will get installed on the Net iD Portal server. Below are instructions in case another, external SQL server is used.
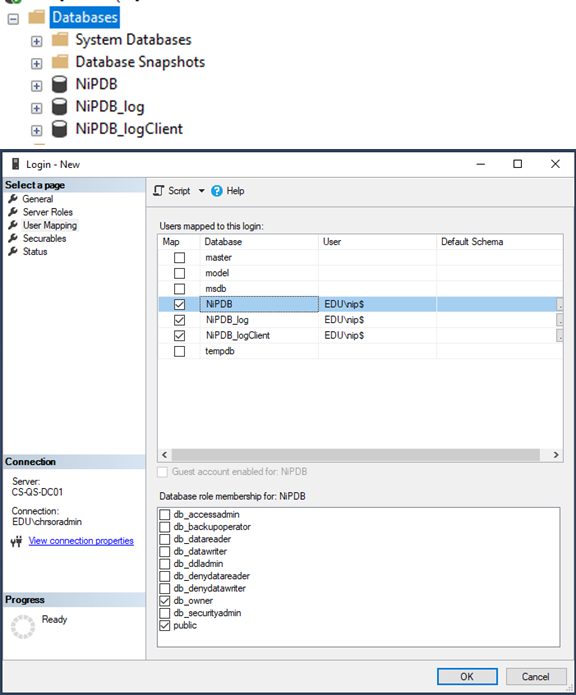
Create three databases on your SQL server:
-
NiPDB
-
NiPDB_log
-
NiPDB_logClient
Give the service account the following permissions on all three databases:
-
db_owner
Set up the certificate service
A certificate service to manage the certificates (enrollment, revocation) needed by Net iD Portal is required.
Certificate templates are the sets of rules and settings that are configured on a CA to be applied against incoming certificate requests. Certificate templates also give instructions to the client on how to create and submit a valid certificate request.
Set the service-account permissions on the CA
The service account (or group) which handles interactions with the CA must have appropriate permissions.
-
On the CA server, open the Certification Authority Management Console by running:
$ certsrv.msc
-
In the left pane, right-click the CA, and then click Properties.
-
In the Properties dialog, click the Security tab.
-
Under Group and user names, click the service-account.
-
Under Permissions for <service-account>, select the following Allow check boxes:
-
Read
-
Issue and Manage Certificates
-
Request Certificates
-
-
Click OK to close the dialog.
Create and configure the Net iD Portal Certificate Template
This is the certificate template that will be used for smartcard or YubiKey certificates via Net iD.
-
In the left pane, expand the CA, and then right-click Certificate Templates and click Manage.
-
In the Templates console, right-click the certificate template Smartcard User, and then click Duplicate Template.
-
In the Properties dialog for the new duplicated template:
-
Click the General tab. In the Template display name box, type the name of your certificate template, and in the Validity period box, type the validity period.
In this example, we will name itNet iD Portal SmartCard User.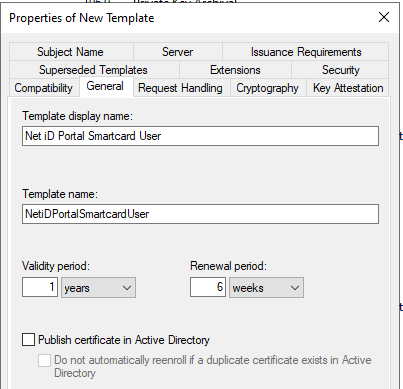
-
Click the Subject Name tab, and in the Subject name format list, select how you want the subject of the certificate to look like.

-
Click the Issuance Requirements tab, and under Require the following for enrollment, click This number of authorized signatures.
-
Under Policy type required in signature, select Application policy.
-
In the Application policy list, click Certificate Request Agent.
-
Click the Sucurity tab. Under Group or user names, click Authenticated Users, and under Permissions for Authenticated Users click Read and Enroll in the Allow column.
-
Click OK to save the new template.
-
-
Return to the CA console and right-click Certificate Templates, click New, and then click Certificate Template to Issue.
-
Click the certificate template you just created, and then click OK. In this example, we named it Net iD Portal SmartCard User.
Configure the Enrollment Agent (Computer) Template
This is needed when the service account must to act as an enrollment agent.
-
In the left pane, expand the CA, and then right-click Certificate Templates and click Manage.
-
Right-click the Enrollment Agent (Computer) certificate template, and then click Properties.
-
In the Properties dialog for the new duplicated template:
-
Click the Security tab. Under Group or user names, click the server you will install Net iD Portal on, and under Permissions for <server name>, click Read and Enroll in the Allow column.
-
Click OK to close the dialog.
-
-
Right-click Certificate Templates, click New, and then click Certificate Template to Issue.
-
Click the certificate template Enrollment Agent (Computer), and then click OK.
Create the Encryption certificate Template
Net iD Portal needs a certificate for TLS (HTTPS) and potentially an “encryption certificate” template for internal service usage.
-
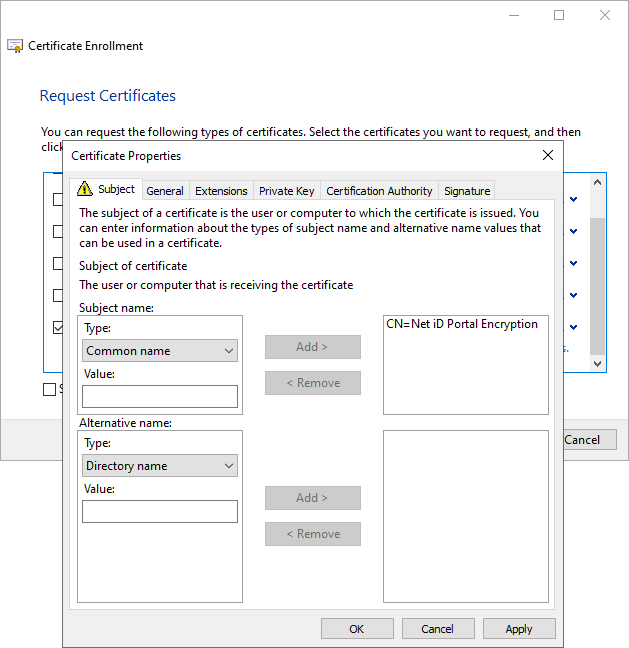
Generate a certificate from the web server template and name it Net iD Portal Encryption on your web server.
-
Click All Tasks, and then click Request Net Certificate….
-
Give the certificate the common name (CN)
Net iD Portal Encryption.
Configure web service certificate permissions
This procedure grants the Net iD Portal service account access to the private keys of the web server certificates so the portal can use them for authentication, encryption, and HTTPS communication.
-
Verify that a web server certificate that includes the correct DNS name is installed on the web server. The certificate can be issued by an internal certification authority (CA) or by a trusted third-party provider.
-
Open Microsoft Management Console (MMC), and then add the Certificates (Local Computer) snap-in. To open it directly, type
certlm.mscin the Run dialog box or in a command prompt, and then press Enter. -
In the Certificates (Local Computer) console, expand Personal, and then select Certificates. If a required certificate is not installed, right-click Certificates, click All Tasks, and then click Request New Certificate.
-
In the Certificate Enrollment wizard, click the Enrollment Agent (Computer) certificate template, and then click Enroll. Repeat this process for the Web Server and Encryption certificate templates.
-
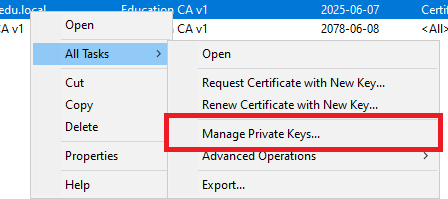
After enrollment is complete, locate each installed certificate: Enrollment Agent (Computer), Web Server, and Encryption. For each certificate, right-click the certificate, click All Tasks, and then click Manage Private Keys.
-
In the Permissions dialog box, click Add, specify the Net iD Portal service account, and then click OK. Under Permissions for <service-account>, select Read, and then click OK.
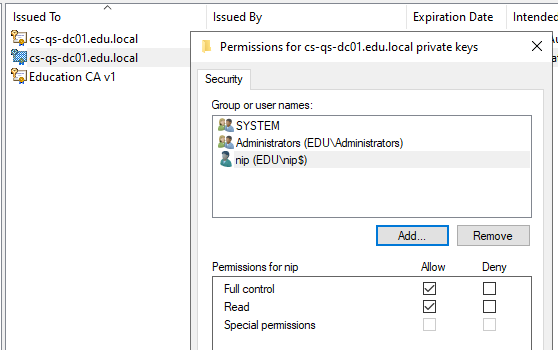
The Read permission allows the service account to access the certificate’s private key, which is required for signing, encryption, and TLS communication.